BST Dictionary Delete - 10 Course Points

The purpose of this lab is to learn how to implement recursive Hibbard deletion for a BST.

You can download and submit the project files via Autolab.

Refer to our Programming Assignments FAQ for instructions on how to install VSCode, how to use the command line and how to submit your assignments.

See this video on how to import the project into VSCode and how to submit into Autolab.

The assignment has one component:


  • Coding (10 points) submitted through Autolab.

Overview

Binary search trees are recursive structures that start off at a node and then branch off into different levels. They store items using keys for comparison — you can’t have duplicate keys in a BST. 

Since there are different ways we can branch off to in a BST, we can’t simply do a linear traversal like we have with arrays and linked lists. We’ll have to use algorithms that traverse deeper into the tree to find all nodes.

Words will serve as the keys, and you’ll use lexicographic order (as .compareTo does) to determine orders and comparisons. For instance, “Data” should be to the left of “Structure” if “Structure” is the root. 

In this lab, you will implement Hibbard deletion, to add a remove word function to the dictionary.

When deleting from a BST, we need to decide how to handle the gap we create. In a linked list, we can simply fill in that gap with the next node. But BST nodes have two children, so which should we choose?

We can use a method called Hibbard Deletion, which says:

  1. If a deleted node has no children, simply unhook it from its parent.
  2. If a deleted node has one child, replace it with that child.
  3. If a deleted node has two children, replace it with its inorder successor
    • An inorder successor is the next node in sequence. i.e. the smallest node greater than the current node (aka the smallest node in the target’s right subtree)
    • To find the inorder successor of a node: move once to the right, then as far left as possible.

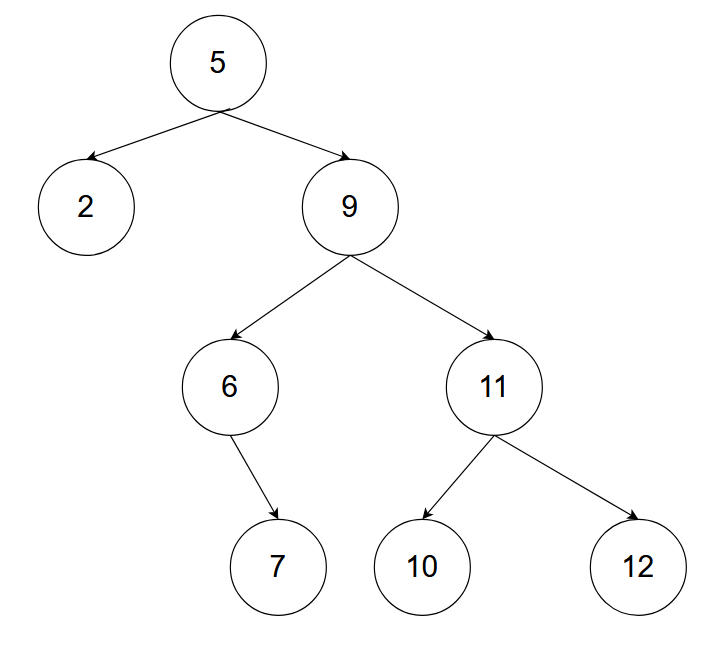
i.e. In the example above, the inorder successor of 4 would be 5. This is because 5 is the smallest node in 4’s right subtree (aka the smallest node in the subtree starting with 9).

We can also see this by listing the entire tree’s inorder traversal, then choosing the key directly after our target:

2 4 5 6 7 9 10 11 12

So after deleting the target, the tree would look like this:

Directions:

  • DO NOT add new import statements.
  • DO NOT add any new class attributes
  • DO NOT change any of the method’s signatures.
  • DO NOT modify the given constructor.

To complete this lab, you must implement the removeWordHelper() method below. The method signature is already given, do not modify these or add any new ones.

Working with BSTNode<> objects

For assignments/labs in CS112, we will use a cs112.jar file containing useful classes. This includes the BSTNode<> class, which implements a binary tree node. You’ve previously worked with the LLNode<> class to create linked lists. Many aspects of the BSTNode are similar:

  • The BSTNode class takes in a generic type, which means it can store any type of data. In this lab you will be working with nodes that have Word objects as their data – to have nodes with City data we can use BSTNode<Word> 

  • Making a node: BSTNode<T> newNode = new BSTNode<T>(data) — replace T with a type

    • Note that the data must be passed in for the constructor, and the data a node holds can not be changed later (aka it is immutable). The data may not be null.

  • Methods: 

    • getLeft() – returns the left child of the node

    • setLeft(BSTNode<T> left) – sets the left child of the node

    • getRight() – returns the right child of the node

    • setRight(BSTNode<T> right) – sets the right child of the node

    • getData() returns the data object a node holds

addWord [PROVIDED]

This method is provided for you, and inserts a node containing a word and definition into the BST rooted at the instance variable “root”. It updates that instance variable if the tree is empty; otherwise it follows BST insertion rules to insert a node in its proper position.

  • Words with names greater than a node’s name are stored to the right of the node, otherwise they are stored to the left. We compare based on word names: we use the compareTo() method to determine where to place words lexicographically (ie. comparing strings).

findMin [PROVIDED]

This is a helper method for your deletion, which returns the minimum node of a tree.

This can be used to find the inorder successor of a target node, by calling findMin on the target’s right child.

DO NOT modify this method.

removeWordHelper

To complete this method:

We will create recursive cases to handle traversal and deletion.  You should use an if-elseif-elseif-else structure to fill out the following.

Base Case: if curr == null

  • return null

First Case: the target word is to the left of curr  (use compareTo to compare strings)

  • Then, set curr’s left child, to removeWordHelper(curr.getLeft(), word)

Second Case: the target word is to the right of curr 

  • Then, set curr’s right child, to removeWordHelper(curr.getRight(), word)

Final Case (when the target node is found):

  • If curr has no children, return null.
  • Else if curr’s left child is null, return the right child instead.
  • Else if curr’s right child is null, return the left child instead.
  • ELSE (when curr has both a left and a right child)
    • Get a pointer to the minimum node of curr’s right subtree (the inorder successor). You can do this by calling findMin() with curr’s right child.
    • Create a new temp BSTNode, and set its word/definition to be the same as the inorder successor you just found.
    • Set curr’s right child to be a recursive call to removeWordHelper(curr.getRight(), temp.getWord())
      • This will delete the temp node from its original spot, allowing you to use it to replace your actual target.
    • Set your temp node’s left child to be curr’s left child
    • Set your temp node’s right child to be curr’s right child
    • return temp

After all of the cases end, return curr.

Driver

Once you implement your code, you can run the Driver.java file and interact with the driver. It’ll show two tabs: “Dictionary” and “BST Display”.

You can add words and definitions, and see all words added in the Dictionary tab, while the BST Display tab will allow you to visualize the BST.

Here’s an example of how the driver works:

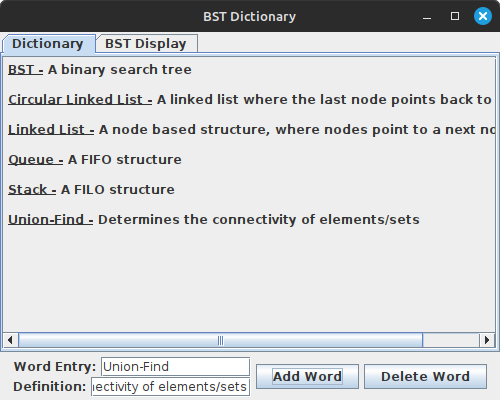
The Dictionary tab shows all words and definitions.

You don’t have to input full definitions for each word each time you test – remember that our tree deletion doesn’t use values, only keys (word names). 

The BST Display tab will allow you to see the BST generated by inserting all nodes. You might have to resize or scroll to see all – use the scrollbars, don’t zoom. 

You can click the “Delete Word” button to call removeWord() on the tree, for the target word. Make sure you spell the word exactly how you entered it, including capitalization and whitespace.

After deleting “Union-Find”:

Writing JUnit Tests

You do not have to submit this, this is for you to test your own code.

In the main project folder, there exists a “test” folder next to the “src” folder. This contains a JUnit test class, which can run and test pieces of your code. To compile and run these tests, you must install the Test Runner extension. See the Programming FAQ for more info on VScode extensions.

You can fill the deletion test in. Once you do, remove the fail() statements at the bottom and run. 

You are provided with a premade JUnit test class. You can finish writing the test methods, by using JUnit test methods (assertTrue(), assertFalse(), assertEquals()) in order to test your code.

If you’d like to use unit tests, you can:

  • Instantiate a new BSTDictionary object.
  • Call .addWord on any words you’d like to insert (remember that BSTs follow specific ordering rules).
  • Delete any node(s)

Tests not running? 

First, make sure you’re in the right folder and the tests are implemented. Next, if you have the “Code Runner for Java” or Oracle “Java” extension, make sure you uninstall those extensions. Remember that you must fill in the tests yourself.

VSCode Extensions

You can install VSCode extension packs for Java. Take a look at this tutorial. We suggest:

Importing VSCode Project

  1. Download BSTDictionaryDelete.zip from Autolab Attachments.

  2. Unzip the file by double clicking.

  3. Open VSCode

    • Import the folder to a workspace through File > Open Folder

Executing and Debugging

      • You can run your program through VSCode or you can use the Terminal to compile and execute. We suggest running through VSCode because it will give you the option to debug.

      • How to debug your code

      • You can hit the triangle “Run Java” button at the top of the Driver.java class, or right click on Driver.java and select “Run Java

      NOTE: if you have BSTDictionaryDelete (2) -> BSTDictionaryDelete or CS112 -> BSTDictionaryDelete in VS Code, open the INNERMOST BSTDictionaryDelete through File -> Open Folder.

Before submission

    • REMOVE all print statements you have written in BSTDictionary.java 

      Collaboration policy. Read our collaboration policy on the course syllabus.

      Submitting the assignment. Submit BSTDictionary.java separately via the web submission system called Autolab. To do this, go to Autolab and find the correct assignment and submit your Java file.

Getting help

If anything is unclear, don’t hesitate to drop by office hours or post a question on Piazza.

  • Find instructors and Lead TAs office hours here
  • Find tutors hours on Canvas -> Tutoring
  • In addition there is the Coding and Social Lounge (CSL), a community space staffed with student community managers which are undergraduate students further along the CS major to answer questions.

By Colin Sullivan