Overview
The ThemeParkQueue.java class represents a Linked-List implementation of a simple queue. The class attributes and constructor are provided.
You must fill in the code for the enqueue(), dequeue(), and appendQueue() methods, to finish the Queue of Strings and enable the Theme Park Queue Driver visualization.
The ThemeParkQueue class is a queue, implemented using a Linked-List. It holds two pointers, one to the front of the line and one to the end of the line. This allows you to enqueue riders at the end of the line, and dequeue them from the front of the line.
Each node in the linked-list is a Rider, which is represented by an LLNode<String> where the String data is the name of the rider. The next field of each LLNode should point to the node directly behind them in line.
EX:

Working with LLNode<> objects
For assignments/labs in CS112, we will use a cs112.jar file containing useful classes. This includes the LLNode<> class, which implements a linked list node. There are other classes in this jar file, which you will be introduced to in later labs/assignments.
- The LLNode class takes in a generic type, which means it can store any type of data. In this lab you will be working with nodes that have String data – to have nodes with String data we can use LLNode<String>
- Making a node: LLNode<T> newNode = new LLNode<>(data) — replace T with a type
- Note that the data must be passed in for the constructor, and the data of a node can not be changed later (aka it is immutable)
- Methods:
- getNext() – returns the next node in the linked list
- getData() – returns the data stored in the current node
- setNext(LLNode<T> nextNode) – sets the next node of the current node to nextNode
Directions
- DO NOT add new import statements.
- DO NOT add any new class attributes
- DO NOT change any of the method’s signatures.
- DO NOT modify the given constructor.
To complete this Lab, you must implement the enqueue, dequeue, and appendQueue methods. The method signatures are already given, do not modify these or add any new ones.
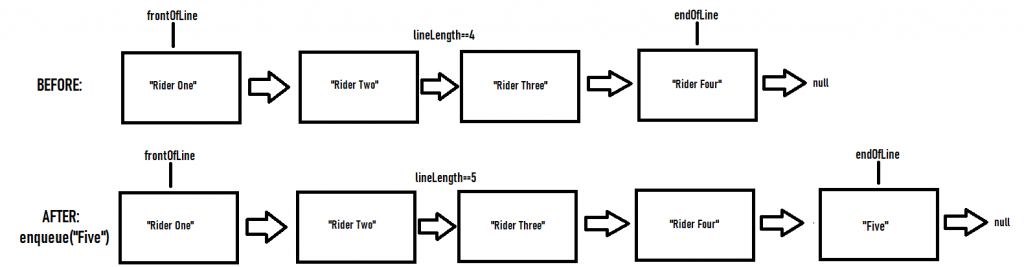
enqueue(String toAdd)
This method adds a new String to the Linked List, by creating a new Rider node to hold the given String. You should always enqueue to the END of the line.
Remember, each node has a next attribute, which is a reference to the LLNode directly BEHIND them. So if Rider1 is in front of Rider2 in line, then Rider1 -> Rider2. So, endOfLine.getNext() should always be null, since there is no one behind them.
If the line is empty (frontOfLine/endOfLine are null):
- Create a new LLNode, and set its data to the given name toAdd.
- Set frontOfLine and endOfLine both equal to that new rider (since if the line is only 1 person long, they are both at the start and the end).
- Increment the lineLength attribute by 1.
Else if the line is not empty:
- Create a new LLNode, and set its data to the given name toAdd.
- Insert that node AFTER the current endOfLine
- Update the endOfLine reference
- Increment the lineLength attribute by one.
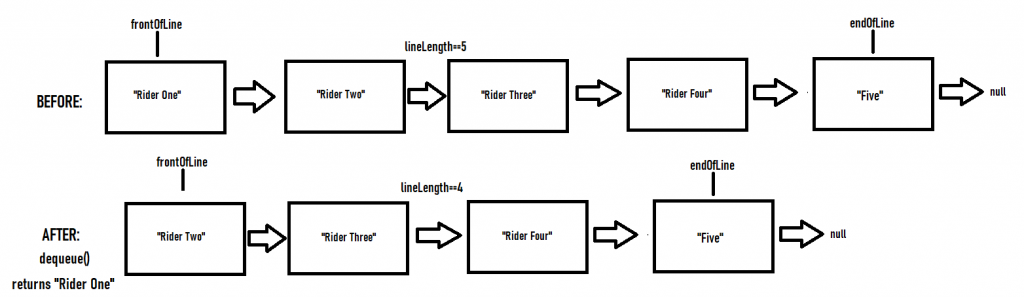
dequeue()
This method removes the Rider at the front of the line, and returns their name.
If the line is empty (frontOfLine/endOfLine are null), then return null.
If the line is not empty, then remove the node at the front of the Queue and return the name of the rider which was removed. Remember to decrement the lineLength attribute by one. Remember to update the references properly.
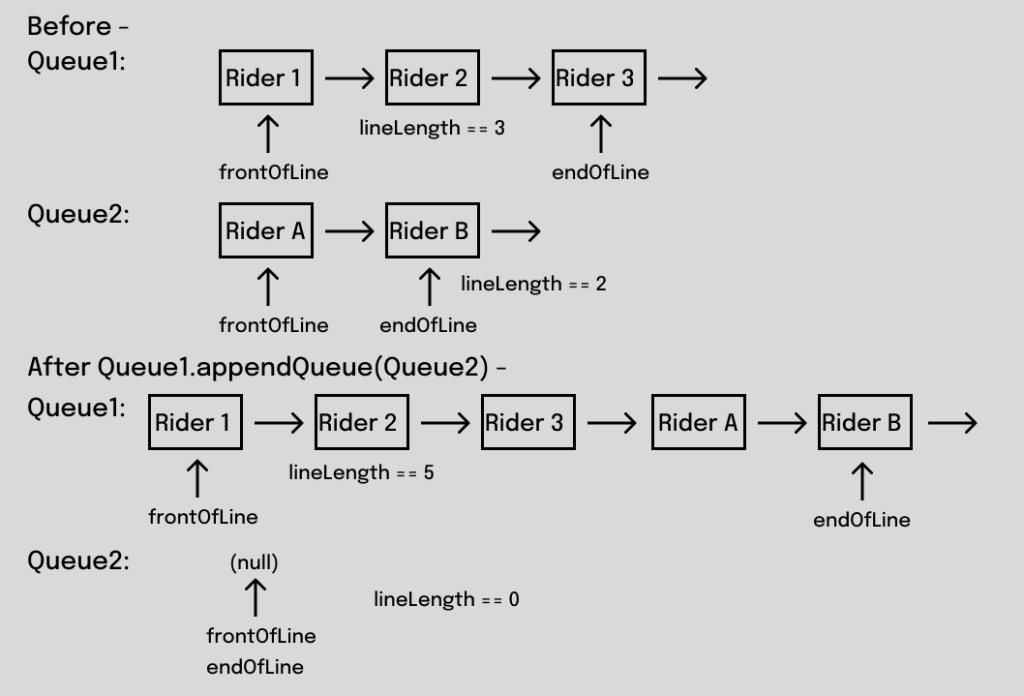
appendQueue(ThemeParkQueue otherQueue)
In this method you will be working with ThemeParkQueue objects as a whole. We want to add all the riders in line from “otherQueue” into the end of the line in this queue, in the same order. We can do this in O(1) time by relinking the nodes and updating our frontOfLine/endOfLine references. Remember to update the lineLength attribute. Remember to take care of any edge cases that may arise for this method.
Once we have appended the riders from otherQueue into this ThisParkQueue, we need to empty out otherQueue since no more riders are present in that queue. Java lets you access private fields of the same class, since we are working with another ThemeParkQueue object and we are within the ThemeParkQueue class, for example you can do “otherQueue.lineLength = /* update */” to update the attributes of otherQueue without a setter method.
VSCode Extensions
You can install VSCode extension packs for Java. Take a look at this tutorial. We suggest:
Importing VSCode Project
- Download ThemeParkQueue.zip from Autolab Attachments
- Unzip the file by double-clicking.
- Open VSCode
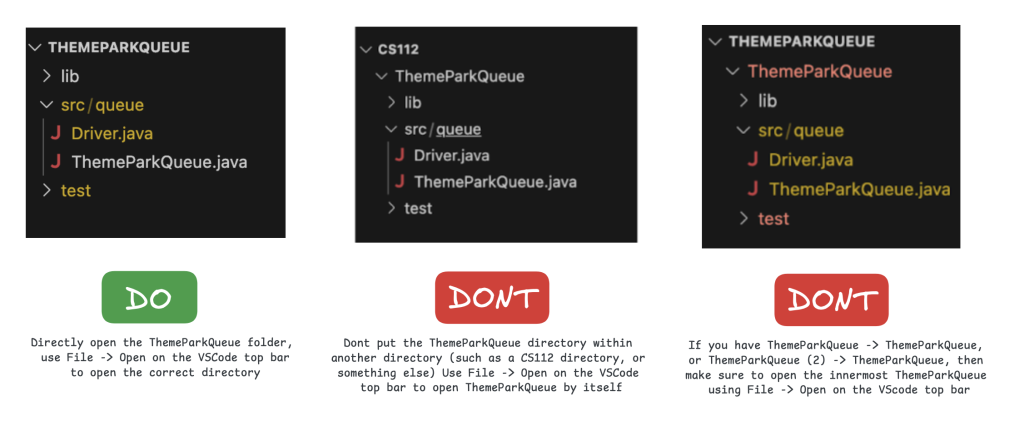
- Import the folder to a workspace through File > Open Folder
Executing and Debugging
- You can run your program through VSCode or you can use the Terminal to compile and execute. We suggest running through VSCode because it will give you the option to debug.
- If you choose the Terminal:
- first navigate to ThemeParkQueuedirectory/folder
- to compile: javac -d bin src/queue/*.java
- to execute: java -cp bin queue.Driver
- NOTE: if you have ThemeParkQueue (2) -> ThemeParkQueue or CS112 -> ThemeParkQueue in VS Code, open the INNERMOST ThemeParkQueue through File -> Open Folder.
- first navigate to ThemeParkQueuedirectory/folder
Before submission
COMMENT all printing statements you have written from ThemeParkQueue.java
Collaboration policy. Read our collaboration policy on the course syllabus.
Submitting the assignment. Submit ThemeParkQueue.java separately via the web submission system called Autolab. To do this, go to Autolab and find the correct assignment and submit your Java file.
Getting help
If anything is unclear, don’t hesitate to drop by office hours or post a question on Piazza.
- Find instructors and Lead TAs office hours here
- Find tutors hours on Canvas -> Tutoring
- In addition there is the Coding and Social Lounge (CSL), a community space staffed with student community managers which are undergraduate students further along the CS major to answer questions.
By Colin Sullivan
