Overview
The PancakeStack.java class has a linked list representation of a stack. The class attributes and the constructor are provided.
You must fill in the code for the push(), isEmpty() and pop() methods to finish the implementation, and to allow the Driver visualization to work. You will then fill in the reverse() method to practice an application of stacks.
There are two class attributes provided:
- LLNode<String> topPancake
- This contains the reference to the top node in the stack, at first this will be null but as nodes get added to the stack this will be updated
- int numPancakes
- Keeps track of how many pancakes (nodes) are in the stack, starts at 0
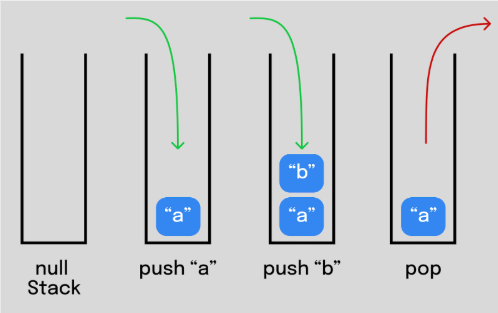
A stack is a last in first out (LIFO) data structure. The newest node added into the stack will go at the very top of the stack. When we remove a node from the stack, we remove the node at the very top. For this reason a linked list representation of a stack only needs one pointer to the node at the very top. We can then add and remove items from the stack in O(1) time.
Overview of files provided
- PancakeStack.java – This file contains the linked list representation of a stack of strings, this is the file that you have to edit. This will be submitted to Autolab.
- Driver.java – this is used to visualize the stack of strings, and will only start to work once you fill in the methods in the PancakeStack class. This will not be submitted.
UPDATE and SUBMIT the PancakeStack.java file to Autolab
Working with LLNode<> objects
For assignments/labs in CS112, we will use a cs112.jar file containing useful classes. This includes the LLNode<> class, which implements a linked list node. There are other classes in this jar file, which you will be introduced to in later labs/assignments.
- The LLNode class takes in a generic type, which means it can store any type of data. In this lab you will be working with nodes that have String data – to have nodes with String data we can use LLNode<String>
- Making a node: LLNode<T> newNode = new LLNode<>(data) — replace T with a type
- Note that the data must be passed in for the constructor, and the data of a node can not be changed later (aka it is immutable)
- Methods:
- getNext() – returns the next node in the linked list
- getData() – returns the data stored in the current node
- setNext(LLNode<T> nextNode) – sets the next node of the current node to nextNode
Implementation Notes
YOU MAY only update the methods with the “write code here” line
DO NOT add any instance variables to the PancakeStack class
DO NOT add any public methods to the PancakeStack class
DO NOT change the headers of ANY of the given functions
DO NOT add any import statements
DO NOT change the class name
DO NOT use System.exit()
Programming
First, ensure that you are working in the correct directory. See this image:

Methods to be implemented by you:
1. push(String pancakeType)
Add a Node to the top of the stack. The top of the stack is referenced to by the pointer called topPancake.
- Make a new node with the String pancakeType as the data
- Then make this node the node at the top (front) of the stack, look at the description for the setNext method above
Then, increment numPancakes by 1 to show that you have added an item to the stack.
2. isEmpty()
This method simply returns true if the stack is empty (there are no pancakes), otherwise it returns false.
3. pop()
Remove the node at the top of the stack, and return the String data of the removed node.
If the stack does not contain any nodes, then return null. Otherwise, remove the top node in the stack.
Decrement numPancakes by 1 to show that an item was removed from the stack.
Finally, return the String data of the node that was removed from the stack.
4. reverse()
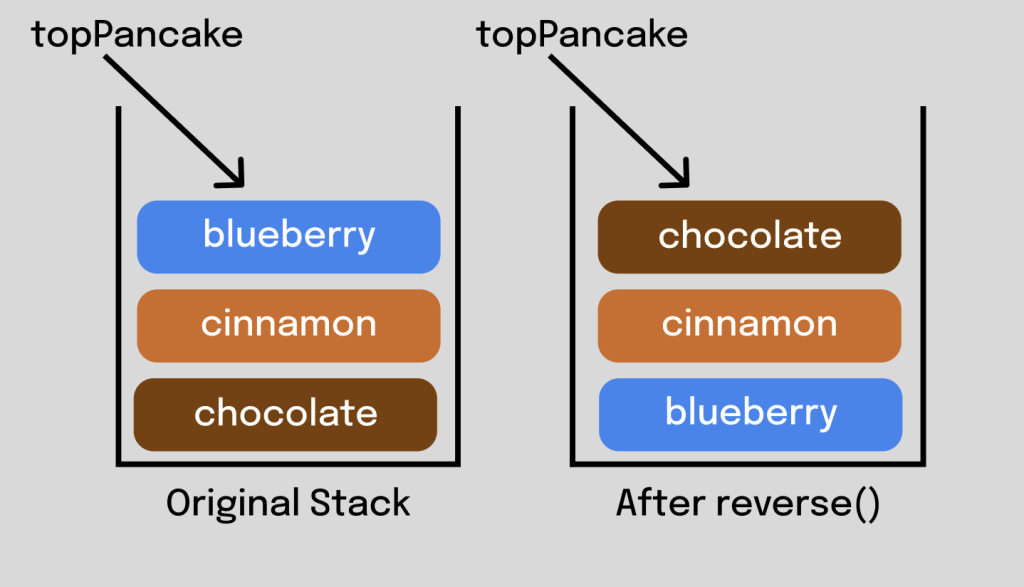
- this.push() – “this” is the keyword used for the current PancakeStack, whenever you call push() or pop() on “this” it will update the “this.topPancake” reference
- otherStack.pop() – if you create another PancakeStack object (called otherStack for example), you can use the push(), isEmpty(), and pop() methods on those stacks as well
- etc.
